
Upgrading my Couch PC monitor, v1.2
TL;DR: My DIY couch PC monitor has been upgraded for a third time.
The story so far...
Almost 3 years ago, I decided to build a gaming PC that I could use from the couch while a) hanging out with my wife and b) not monopolizing the living room TV.
The PC was simple: it's just a cube behind the couch. Mouse & keyboard & headphones are also easy—USB cables come in long lengths and Bluetooth is a thing.
No, the hard part was the monitor. I had been gaming on a 2012 15" MacBook Pro—which was physically convenient but lacking in performance. A gaming PC solves the latter, but no one seems to sell 15" standalone monitors equivalent to my laptop screen. That was when I discovered an Instructable article about how to turn an old laptop into a desktop panel. That gave me ideas.
Version 1.0 - Artisanal Acrylic
Turns out, there are vendors on eBay who offer complete kits for hooking a laptop display panel up to a PC. They just don't come with any kind of enclosure like your typical computer monitor. So, I ordered one of those kits and tried handcrafting a case. It turned out crude yet functional:

 of DIY monitor and IKEA DAVE](/uploads/2017/diy-monitor-v12/8447859933_c1bf2c05aa_z.jpg)
Version 1.1 - Custom Picture Frame
I used that first version for a year in my living room. It was ugly & heavy & awkward. Happily, I fell upon this Instructables article that pointed me to American Frame. They'll produce a rectangular picture frame in just about any custom size you'd like—height, width, and depth.
So, I ordered a nice matte black metal frame close to the size of my display panel. I ended up with this:
Sleeker and lighter. The back of the picture frame was just foamcore and I used double-sided tape on the monitor arm and all the electronics. Luckily, the panel and all were light enough for these hacks. But, it kind of fell apart across two house moves.
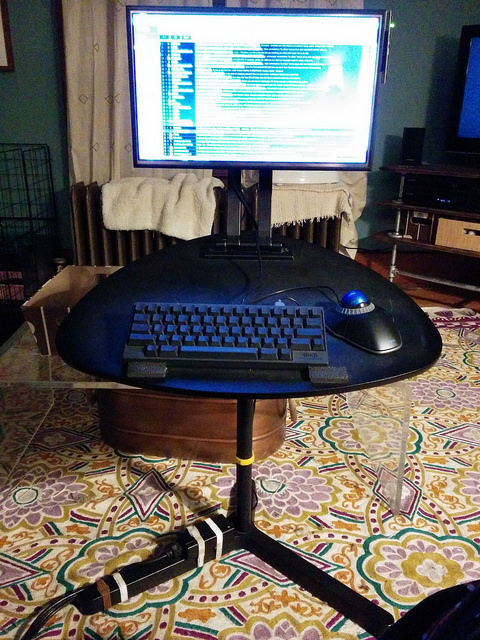
Version 1.2 - Mic Stands & Laser Cutters FTW
I decided I wanted to minimize things. The Ikea Dave laptop stand seemed a bit much, especially when I needed to move it around—or hide it when company came over.
Last year, I (finally) got a membership at i3Detroit. I skilled up on laser cutters and made a DIY keypad that I showed off at the Detroit Maker Faire. Things that, you know, I should have done years ago at the start of this whole DIY monitor project—rather than cutting things by hand and with a Dremel.
Anyway, I discovered that there's a such thing as a VESA mount for microphone stands. I bought those and threw in an adapter & a gooseneck—all of which let me strip my rig down like so:
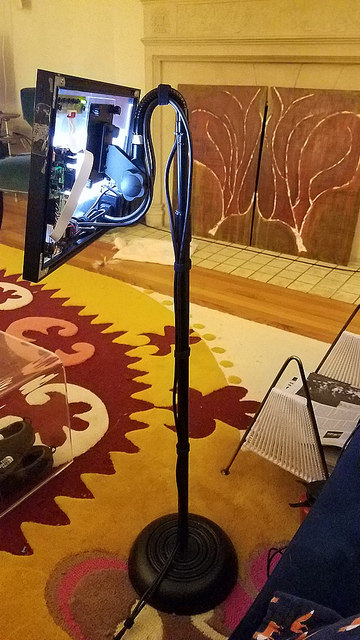
By this point, the double-sided tape and the foamcore just weren't up to the task. I decided that I needed to use my laser cutter skills and spare stock of acrylic sheets to build a new mounting solution.
I came up with this in Inkscape:

This is a flattened image (linked to the original SVG) of what turned out to be two 2.5mm and two 1.5mm sheets behind the laptop display panel. This layout has places to bolt in all of the electronic components of the monitor—driver board, button panel, and power supply. It's also got a proper 75/100 VESA mount that accepts 10mm thumbscrew bolts through the mic stand plate.
The main thing that worked out better than I expected is this: 
The two 1.5mm layers have rectangular cut-outs. Each of those trap a 3mm thick hexogonal M4 nut and act as wrenches. The 2.5mm layers have holes for bolts. With a little Dremel work, I have a set of M4 bolts that are trimmed so as to prevent grinding into the display panel behind the acrylic layers.
After a trip to i3Detroit yesterday, I ended up with this:
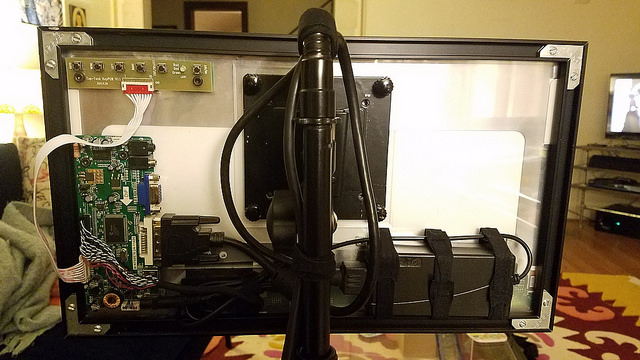
I improvised attaching the power supply with bolted-down velcro straps. And, alas, the "roof" I made for the driver board didn't quite work—I need longer bolts & spacers. But, the 75/100 VESA mounting holes worked great!
The whole thing is now decidedly heavier than with the old foamcore—but it's still lighter than v1.0 and any other comparable monitor I've seen. It's also much sturdier: I can turn & adjust it however I like with the gooseneck without the constant threat of duct tape tearing and falling apart. And, of course, the mic stand raises & lowers easily.
But, when I do want to take it apart, it's totally doable without worry. Cables unplug, thumbscrews unscrew, the mic stand breaks down—and the whole thing can hide under the couch in pieces.
Next steps?
Enclosure upgrades notwithstanding, this is a 3-year-old 17" 1080p monitor. I'm starting to feel the itch for a 4k panel since I upgraded my video card. But, there's apparently still no one who sells such a thing as a readymade product.
Meanwhile, on eBay, there are vendors offering 4k versions of the kit that started me off on this whole adventure. I'm tempted to order one of those and use what I've learned so far to build the next revision of my monitor in a picture frame with a laser-cut VESA mount back panel.
Maybe I'll retire this 1080p monitor for use with my CHIP Pico-8 console kit for a snazzy all-in-one barcade project. In any case, I'm just happy my lovely wife continues to tolerate this experiment of mine in living room couch gaming.